
Mortal Shell 2 Tarstones: Effects, Compatibility and Upgrades
Check Mortal Shell 2 Tarstone effects, compatible slots, XP, Tarforge upgrades, Fragile Tarstones, and what the Week 1 patch changed.
Mortal Shell 2 Tarstones change attacks, sidearms, support bonuses, and Resolve abilities. The current route groups them into Support, Combat, Infusion, and Ability functions, with compatibility deciding which weapon or sidearm can use a stone. Equipped Tarstones gain experience through combat and can later be improved at the Tarforge. Use the Tarstone locations guide when the question is where to find a stone.
What changed for Tarstones in the Week 1 update?
The official August 29 update adds Fragile Tarstones, a Glimpse Stone, and Egon’s Stone. It makes Glimpses and Tarcores non-finite, increases Tarcore returns when Tarstones break, expands Merrick’s stock, and converts existing Justicar’s Stone and Gloombound Stone copies to Fragile versions. These changes improve one-playthrough upgrade planning, but they do not publish a complete effect or compatibility table.
What Tarstones change
The effects reference includes passive bonuses such as melee critical chance, ranged critical damage, damage reduction, Resolve gain, and low-health damage. Other stones consume Resolve to add a charged attack, an elemental or status infusion, a projectile effect, or a special combo. These effects should be read from the displayed stone text because similarly named entries can serve different equipment slots.
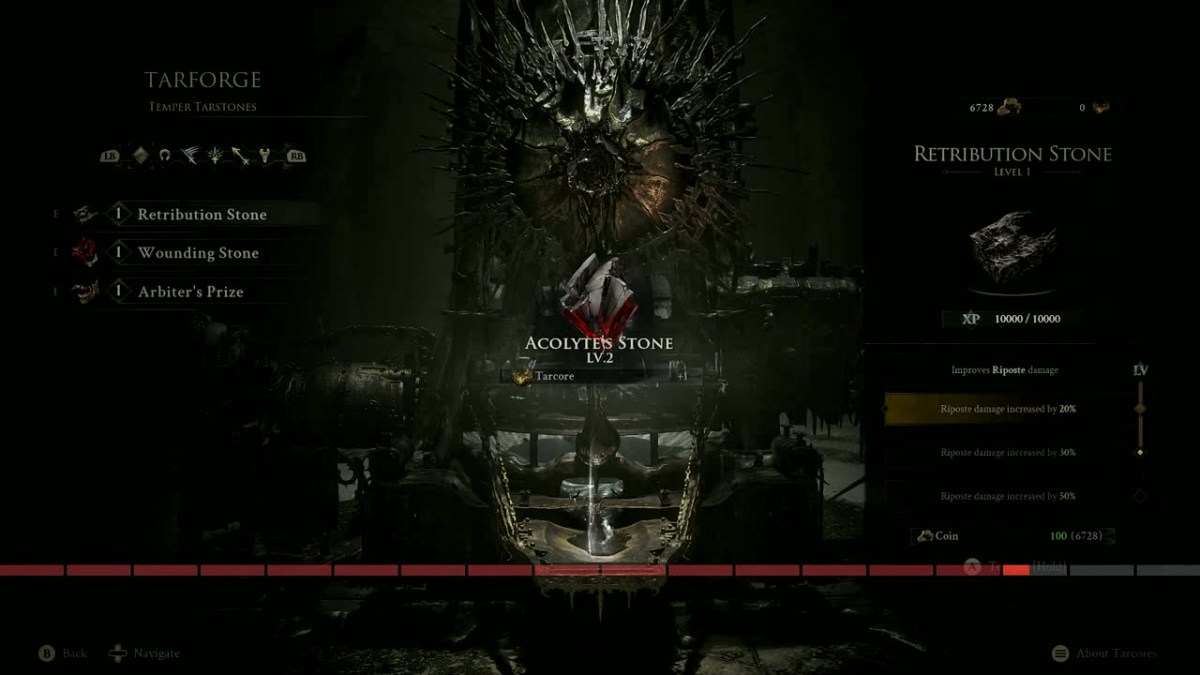
Current route records name examples such as Auspicious Stone, Acolyte’s Stone, Bulwark Stone, Berserker’s Stone, Deadeye Stone, Devout Stone, Wounding Stone, and Clockwork Shardstone. Some entries have a clear effect line, while others are displayed with incomplete text. Missing or version-sensitive effects are To be confirmed.
Tarstone categories and compatibility
Support Tarstones occupy character-oriented slots for passive bonuses. Combat stones change a normal melee combo or another attack behavior, while Infusion stones add a status or elemental property to compatible attacks. Ability stones grant an active technique, commonly powered by Resolve.
The route says a melee weapon can accept compatible Ability, Combat, and Infusion Tarstones, and a sidearm follows the same compatibility rule for its own equipment. A stone can be strong in theory and still be unusable in the chosen slot. Check the category and the named compatible equipment before spending upgrade resources.
XP and active loadouts
Tarstone XP is earned while the stone is equipped during combat and enemy kills. The current game version says a stone left in the inventory does not progress, and that the level belongs to the stone when it is later moved to another compatible weapon or sidearm. This makes an enemy-heavy route a good time to level a stone you expect to reuse.
The exact XP thresholds differ across the route pages. One Tarforge page descriptions 10,000 XP for the first level step and 20,000 XP for the next major step, while another describes a four-level structure without publishing one universal table. Keep those values tied to their page and mark the final retail progression as To be confirmed.
How to choose a Tarstone build
Start with the attack or problem that matters most in your current run. A melee critical build can use a critical chance stone with a critical damage option, a Resolve build can combine a reliable generator with an Ability stone, and a ranged build can select charging, piercing, grouping, or splash behavior. A defensive setup can use Bulwark Stone when its displayed effect is available.
Do not fill every slot with effects that solve the same problem. A sidearm build needs a compatible ranged modifier, while an aggressive melee setup may value Resolve gain or Break Damage support. The best complete loadout for every Shell and weapon is To be confirmed because the current game version does not include controlled retail testing.
Important Tarstone examples
Auspicious Stone is described to improve melee critical chance, and Deadeye Stone is described to improve ranged critical damage. Bulwark Stone is described to provide damage reduction to all characters, while Berserker’s Stone improves melee damage as health falls. Wounding Stone applies Perforation through melee attacks in the effect list.
Clockwork Shardstone is described as a Resolve-consuming effect that keeps a weapon’s chainsaw spinning, and Accursed Stone is described as a sidearm Curse infusion. These names and effects come from guide pages. Exact upgrades, compatibility, locations, and final balance remain To be confirmed where the entry is incomplete.
Tarforge upgrades
Tarstone upgrades become available through the Tarforge after the Etching Needles unlock the relevant function. The Tarforge guide says Coins are used for an early level step and Tarcore is required for later progression. It also says Tarcore is earned by leveling other stones, creating a reason to rotate several stones through active combat.
The Tarforge location, item route, costs, and level caps should be read with their build labels. The official store description confirms an upgrade system, while the exact Tarstone table comes from community pages. Keep unsupported costs, maximum levels, and universal recommendations To be confirmed.
How many Tarstones are there?
The location pages do not agree on one final total. One detailed guide lists 73 locations, while a newer community discussion lists 75. The official Steam page confirms exploration and upgrades but does not publish a Tarstone count, trophy requirement, or complete effect table.
Use the count as a checklist version, not as an established fact. Record the page date, platform, region, and item names when comparing lists. Duplicate names, changed labels, or a later retail entry could explain the difference, yet the current game version does not prove which explanation is correct. The final total is To be confirmed.
What makes a useful Tarstone comparison?
Compare the effect, slot category, compatible equipment, resource cost, and upgrade state together. A stone that improves a critical chance may serve a different purpose from one that changes a combo or infuses a sidearm, and the same name can appear in different route discussions. Use the current client text when an effect line is incomplete or a guide gives conflicting numbers.
For a build note, record the weapon, Shell, active stones, enemy type, and result of the test. This makes it possible to separate a strong interaction from a universal ranking. The current version supports the categories and examples on this page, while final balance and complete compatibility remain To be confirmed.
When should you level a Tarstone?
Equip the stone before an enemy-heavy route if you want its XP to progress during combat. Use the Tarforge when the displayed threshold is reached, then check whether the next step asks for Coins or Tarcore. The routes describe this progression, but they disagree on some thresholds and level language.
Do not spend a rare resource on a stone that your weapon cannot use. Confirm the category, slot, and compatible equipment first, then test the effect against a repeatable enemy. The final XP table, level cap, Tarcore amount, and post-patch balance are To be confirmed.
Related Articles
combat
Mortal Shell 2 Enemies and Encounter Combat Tips
Review Mortal Shell 2 enemies shown in gameplay and learn how posture, Harden, shields, sidearms, and careful spacing shape encounters.
combat
Mortal Shell 2 Gloom Farming: Uses, Recovery and Upgrades
Learn what Mortal Shell 2 Gloom is used for, how death recovery works, and what the official Week 1 update changed without an invented farming table.
combat
Mortal Shell 2 Harden Mechanic and Combat Guide
Learn how the Mortal Shell 2 Harden mechanic protects one exchange, creates Break Damage opportunities, and fits beside parry, dodge, and Resolve.
Was this helpful?
Thanks for the feedback!